Been awhile since I’ve posted anything (although my cooking adventures
continue) but I’m back with something that’s hopefully interesting to
all! Today, we’re going to be going over the process of building an
AR-15 pistol. One of the reasons for the massive popularity of this
weapon is its customizable and modular nature. You can build basically
any configuration you like, in nearly any caliber you like. The AR-15
platform is a superb base for anything from small pistols to long range
precision rifles. Its almost like LEGOs for grown-ups; the only limits
to what you can build are your imagination (and the laws in your
jurisdiction of course). Assembly is almost as simple; once you’ve
sourced the parts you can put it all together in less time than an IKEA
coffee table.
Today we’ll be building an AR-15 pistol, chambered in .223 (in) / 5.56
(mm). Why a pistol you ask? Well that’s an interesting bit of legalese.
Rifles with a barrel length of less than 16” are specially regulated by
the ATF and fall into a separate classification known as “short
barreled rifles” They are still legal to own in most states, but require
additional paperwork and the acquisition of a $200 tax stamp from the
ATF. Yes, it’s actually a physical stamp like you’d put on an
envelope (albeit an expensive one)! However, if you do not put a
traditional stock or vertical foregrip on the weapon, it is classified
not as a rifle (and thus not a short barreled rifle) but a pistol
instead. As a pistol, it’s regulated exactly the same as any traditional
pistol is. As this will be my third build and I already have a couple of
traditional carbine-length AR-15s; I want to switch it up with something
novel. For this reason, I’ll be using a super-short 7.5” barrel, and
making a pistol. Lets get started!
The first part we need is called a lower receiver. You can
think of this as the backbone of the gun. Everything else will attach to
it. This is also the part of the gun that is serialized and legally
considered a firearm. All the rest of the parts can be shipped directly
to you – but this will need to be sent from the retailer to a local
federally licensed dealer. There you will fill out your paperwork, get
your background check, and undergo your three-day waiting period. Upon
the completion of those things, you can return and pick it up!
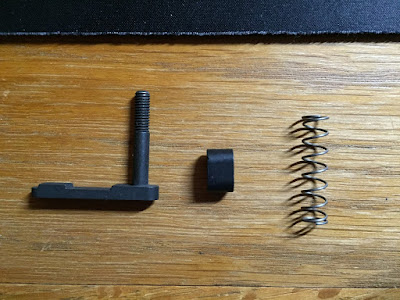
The first thing we’re going to do is attach the magazine release. This
is the spring-loaded button that holds the magazine in position.
Pressing it releases the magazine from the receiver. You can see how
that works below.
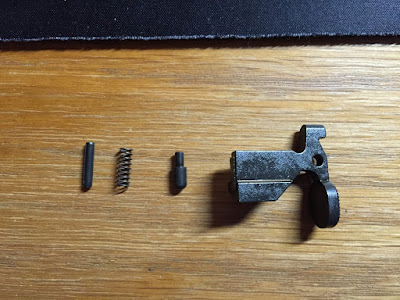
The next thing we’ll be installing is the bolt catch. This holds the
bolt open after the last round has been fired and the magazine is empty.
Depressing it releases the bolt and chambers the next round from the new
magazine.
Next, we’re going to install the pivot pin. This is used to attach the
upper receiver to the lower receiver and allows for easy takedown of the
gun for cleaning and maintenance. You’ll see this in operation a bit
later.
Next come the trigger and the hammer. These drop into the lower receiver
and are held in place by two more pins. The trigger releases the hammer,
which interfaces with the bolt and causes the weapon to fire.
The next component we’ll install is the recoil system. This consists of
the buffer tube, the buffer, which is just a weight, a spring, and some
more pins. This works (along with the bolt carrier group) similarly to
the slide on a pistol – moving backwards with the recoil of a shot and
then chambering the next round when it returns to its natural position.
At this point, it’s beginning to resemble a firearm. You can see the
buffer tube attached to the back, the trigger inside the trigger guard,
the bolt catch protruding from the top, and the pivot pin at the very
front of the receiver.
The final major component of the lower receiver is the selector switch
or safety. The switch is inserted through the side of the receiver and
is actually held under tension by a small spring and pin that are
inserted into the bottom of the receiver. The spring and pin are in turn
held in place by the attachment of the grip.
At this point we’ll also attach our buffer tube cover. Traditionally,
this is where you’d mount your stock but, since we’re building a pistol,
we won’t have a stock. Instead, we’re going to use a cheek rest. This
allows you to get an additional point of contact on the firearm and a
consistent sight picture by establishing a cheek weld. It legally does
not however, constitute a stock as long as you do not shoulder it.
We now move on to the upper receiver. Attaching the gas tube, hand
guard, and barrel to the upper receiver require tools that I do not
have at home, so I had it done in the shop. Apologies for skipping
ahead. With that done, we insert the bolt carrier group and the
charging handle into the upper. The charging handle is used to chamber
a round and the bolt carrier group contains the bolt and firing pin
that will actually strike the round.
We’re almost done! The upper receiver attaches to the lower receiver via
that front pivot pin we installed earlier. It swings down into place and
a second pin in the back holds it secure.
With that complete, the only thing left to do is install our optic. I’ve
put a red dot sight on this pistol. The top rail is an industry standard
for mounting accessories and optics, so the whole thing is basically
plug-and-play. Usually, you would also attach iron sights as a backup,
in case your optic breaks or runs out of batteries, but this gun is
destined to be only a toy for the range and not a practical weapon of
any sort.
And there we have it – a 7.5” AR-15 pistol. The entire assembly process
takes about an hour. Not too bad. At this barrel length, its not a
particularly practical weapon. It's short enough to rob the 5.56 round of
much of its velocity, and the full powder charge of each round does not
burn inside the barrel. You end up with an underpowered round and a
giant muzzle flash, which doesn’t make for a particularly useful
firearm, but it does make for a fun day at the range!
Here it is next to one of its full-sized friends for scale:
Obviously there is a ton of political debate swirling around this sort of thing,
but I’ve tried to side-step it all and just focus on the build process
itself. Hope you found it enjoyable! If anyone has any questions, I'm happy to answer them!


That's awesome dude.
ReplyDelete